專注Java教育14年
全國咨詢/投訴熱線:400-8080-105
更新時間:2022-07-11 12:49:17 來源:動力節點 瀏覽6219次
調用回滾操作會撤消 Transaction(T i )所做的所有影響或修改,并終止 T i并且所有變量都將其先前的值存儲起來。回滾主要是在 Transaction(T i )語句中出現一個或多個 SQL 異常時調用,然后 T i中止并從頭開始。這是了解已提交和未提交的唯一方法。
SQL 異常只是表明您編寫的語句中有問題,但沒有提及錯誤的內容和位置。所以剩下的唯一選擇就是調用回滾方法。
程序:它主要處理兩個步驟。首先,創建一個數據庫,然后處理事務。
1.創建數據庫
2.執行回滾事務
導入數據庫
如有必要,加載和注冊驅動程序
創建新連接
創建提交/回滾語句
執行提交/回滾查詢
處理結果
關閉連接,否則之前的處理可能會丟失。
第 1 步:我們還可以將數據庫中的修改回滾到特定標志或保存點,只需將所需的保存點名稱作為參數傳遞給以下方法
// 設置標志或保存點
con.rollback("MysavePoint");
第 2 步:回滾事務,使用Class的 API 方法forName(String className)加載 JDBC 驅動程序。在本例中,我們使用 Oracle
使用registerDriver( )方法注冊所需的驅動程序
   // 注冊需要的驅動
   DriverManager.registerDriver(new com.mysql.jdbc.Driver());
使用 DriverManager 的 getConnection() API 方法獲取連接信息:
  // 獲取連接
   String url = "jdbc:mysql://localhost/mydatabase/icpc";
   Connection conn = DriverManager.getConnection(string url, String user, String password);
使用 off connection setAutoCommit(boolean auto-commit) 方法的 API 方法禁用自動提交:
   // 將自動提交設置為 false。這將執行所有
   // SQL 語句作為單獨的事務
   con.setAutoCommit(false);
現在,使用 setSavepoint() 設置保存點,或者使用連接的 API 方法 commit() 提交事務,如下所示
   保存點 savePoint = con.setSavepoint("MysavePoint");
   Con.commit();
如果發現任何 SQL 異常,在這種情況下,為整個事務調用 rollback() API 方法,直到之前設置的保存點:
   con.rollback() 或者,
   con。回滾(my_Savepoint);
實現:演示rollback()和commit()程序的Java程序如下
// Importing generic java libraries
import java.io.*;
// Retrieving SQL DB
// javaconnector-linkage for JDBC
import java.sql.*;
import java.sql.SQLException;
import java.sql.DriverManager;
import java.sql.Connection;
import java.sql.ResultSet;
import java.sql.Statement;
import java.sql.PreparedStatement;
import java.sql.Date;
// Importing drivers(if necessarily)
// GFG class only to illustrate JDBC
// not illustrating connection class
class GFG {
	/* Step 1: Importing DB */
	// Database URL so as to create/fetch data from DB
	static String DB_URL
		= "jdbc:oracle:thin:@localhost/my_database_";
	// DB userID
	static String DB_USER = "local";
	// Remember randomly self createdDB password
	// to deal with above DB root
	static String DB_PASSWORD = "test";
	// Main driver method
	public static void main(String args[])
	{
		// Try block to check exceptions if occurs
		try {
			/* Step 2: Loading and registering drivers*/
			Class.forName(
				"oracle.jdbc.driver.OracleDriver");
			/* Step 3: Create the new connection */
			Connection conn = DriverManager.getConnection(
				DB_URL, DB_USER, DB_PASSWORD);
			// set auto commit of the connection to false
			conn.setAutoCommit(false);
			/* Step 4: Create a statement */
			// Input the info into record
			String sql_
				= "INSERT INTO Employee (empid, empname) VALUES (?, ?)";
			// Create a Statement_object
			PreparedStatement ps
				= conn.prepareStatement(sql_);
			/* Step 5: Execute a query */
			// Take user input
			BufferedReader br = new BufferedReader(
				new InputStreamReader(System.in));
			while (true) {
				// Asking user to enter data(EmpID)
				System.out.print("Enter emp_Id: ");
				// Reading above user entered EmpID
				String s_1 = br.readLine();
				int empid = Integer.parseInt(s_1);
				// Asking user to enter data(EmpName)
				System.out.print("Enter emp_name: ");
				// Reading above user entered EmpName
				String name = br.readLine();
				// Creating entry in table
				// Set emp_id
				ps.setInt(1, empid);
				// Set emp_name
				ps.setString(2, name);
				// Execute the updation operation
				ps.executeUpdate();
				/* Step 6: Process the results */
				/* Displaying choice what user wants to do
				with updation, either Commit() or
				rollback() */
				System.out.println("commit or rollback");
				// Reading choice from user
				String answer = br.readLine();
				/* Asking user's choice for condition
				* check*/
				/* Checking if users want to commit or
				* rollback */
				// If user wants to commit
				if (answer.equals("commit")) {
					conn.commit();
				}
				// If user wants to rollback
				if (answer.equals("rollback")) {
					// Rollback the update in case if some
					// flaw in your record
					conn.rollback();
				}
				/* Display message to user for inputing next
				record if user wants to add */
				System.out.println(
					"Do you want to include more records");
				/* Asking choice */
				System.out.println("\n yes/no");
				// Read user's choice
				String answ = br.readLine();
				if (answ.equals("no")) {
					break;
				}
			}
			conn.commit();
			// Print message
			System.out.println(
				"record is successfully saved");
			/* Step 7: Close the connection */
			// calling commit() before closing connection
			// else updation would be lost
			conn.close();
		}
		// Exception handled if occurred by catch block
		catch (Exception exc) {
			// Highlighting line where exception occurred
			// as execution is equal
			exc.printStackTrace();
		}
	}
}
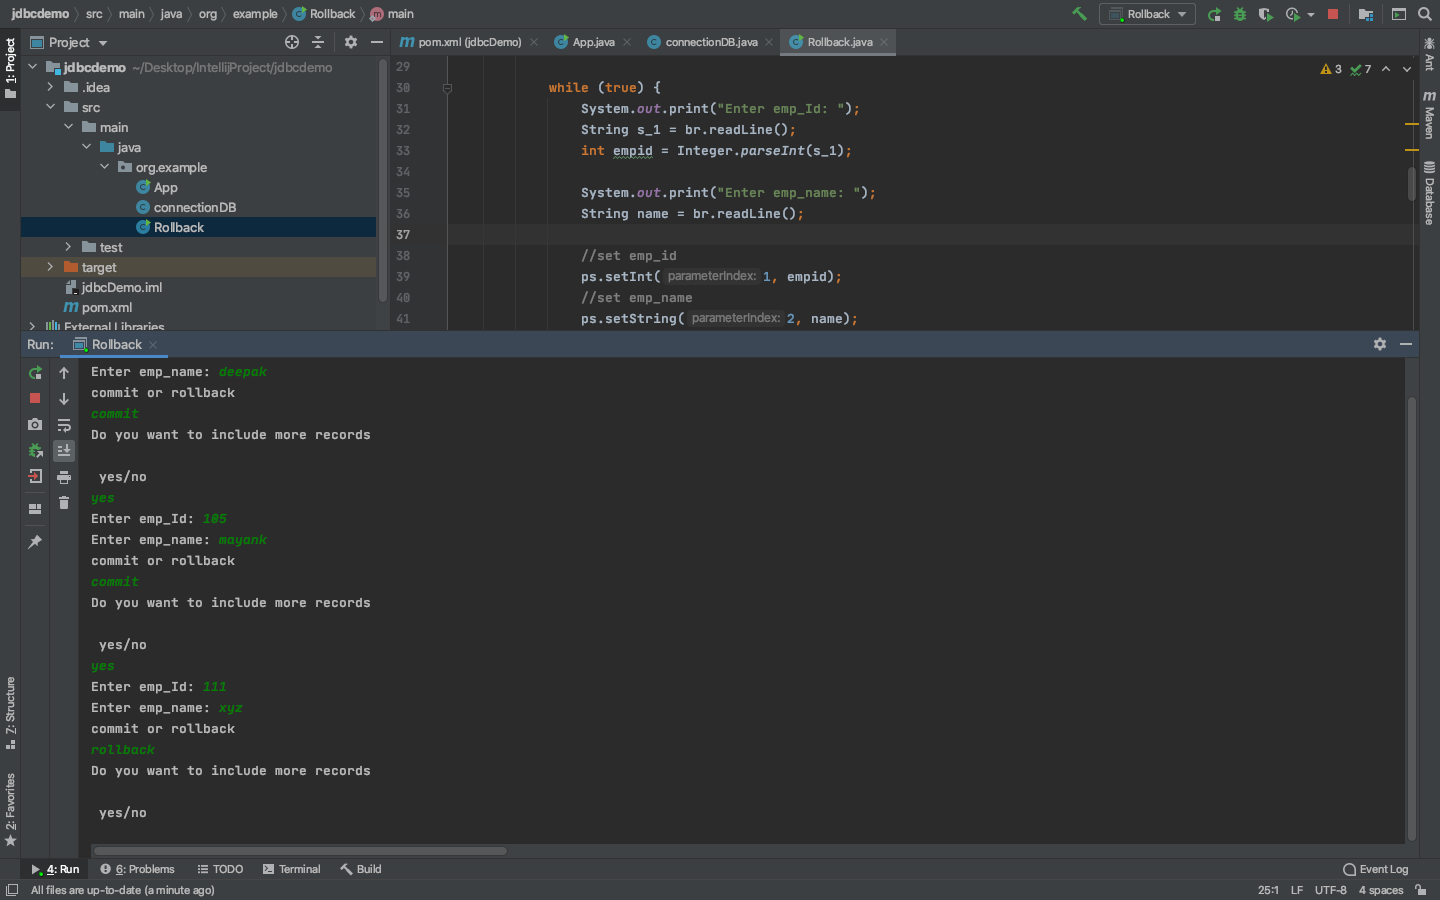
輸出:有兩個示例輸出圖像涵蓋了這兩種情況:提交和回滾或簡單地直接回滾,如下面的輸出所示。
 Java實驗班
0基礎 0學費 15天面授
 Java就業班
有基礎 直達就業
 Java夜校直播班
業余時間 高薪轉行
 Java在職加薪班
工作1~3年,加薪神器
 Java架構師班
工作3~5年,晉升架構
提交申請后,顧問老師會電話與您溝通安排學習


官方微信

官方抖音


 京公網安備 11030102010736號